I have had so many emails asking about the mini-reno we did to our builder basic kitchen, so I thought I would show the pics again and give you a rundown on the costs.
The kitchen had good bones and nice maple cabinets, but that was all. The walls were painted white as you can see in the sliver of wall on the right, the cabinets were a blonde color and very flat looking and the countertops were a beige leather textured light beige color. Put all that together with white appliances, sink and faucet and this was a really bland kitchen with zero personality. In this pic you can see that I had already painted the walls a chocolate brown (Soul Chocolate by Ralph Lauren). This at least toned down some of the white so you weren’t blinded you as you walked in since there is a ton of light from all those huge track lights. (Sorry, this pic was taken at night and with a flash, so really bad.)
After painting the walls, I wanted to darken the color of the cabinets a bit, but I didn’t want to have to strip them and refinish. I knew that Brie wax was used to darken the color of furniture, so I bought the darkest shade I could find and used it on all the cabinets. Immediately they looked 100 percent better and about 3 shades darker, plus they had some depth and personality. So much better. I have been asked about the wax a million times and I always tell everyone that has some grain in their cabinets, the grain will stand out much more with the wax, so try the inside of a door first to make sure that you like the results. There is no going back once you start unless you really do want to strip and start all over or paint. Next we added pulls to all the drawers and doors and undercounter lights. I work with just the undercounter lights most of the time, much softer than the overhead track lights.

I looked at several magazines to see how they installed their hardware and decided to center mine on the drawers and place the door pulls on the edge. I used different sizes also to give the look some continuity. This section has 6″ on the drawers and 8″ on the doors.

These three drawers got the largest pulls and is the only place they are not centered. These are 14″ pulls.

On the doors under the sink I put two 8″ inch pulls at the top so I could hang some kitchen towels in a handy easy to reach place.

The major remodel was confined to the island. Since it seemed to be the center of attention in the kitchen, it needed the most help and was the most bland of all. See how all that white just blinds you and that counter, kitchen sink and faucet are so ugly.
My daughter had all of her counters changed to granite and surprised me with a remnant piece that her installers had. It was just large enough to have fitted to the island. Talk about a happy dance, I was so thrilled. This is a pic taken as the installers were finishing up the installation.

I wanted the island to have a larger overhang to allow more leg room for barstools. Since the depth of the hang-over is 14″, the installers suggested that I place some corbels under to help support the granite. I found these wood ones online and they were screwed into the side studs of the base of the island, so they really do support the granite. I painted them the same color as the island ( a soft camel color ) and then glazed them to show the carving details.

We replaced the really cheap white shallow sink with a wonderful deep heavy stainless one.

I also found the faucet, soap dispenser and sink all on line at really fabulous prices. While we were at it we decided to replace the garbage disposer with a new heady duty one. We took the old counter off with the sink, faucet and garbage disposer all in tact and it was given to Habitat. When the driver came to pick it up he said he wanted it desperately, he was redoing a house and this would be perfect for the island he was building. So, it worked out perfect.

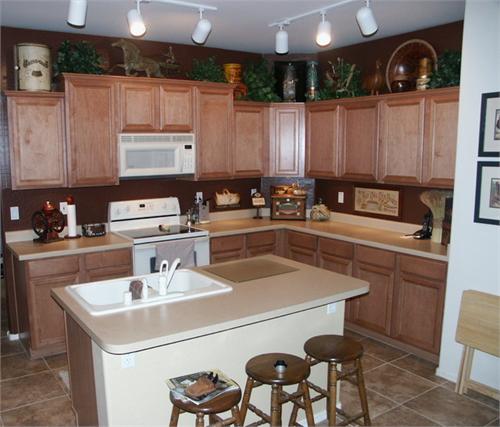
This is a picture taken after the kitchen was all cleaned up.

Before
After. Since the island is the center of attention and the granite just draws your eye there, the kitchen has a really updated look and most people don’t notice that we don’t have granite on all the counters.

Cost Breakdown
Paint $30
Corbels – Osborne Wood Products ( on line ) $29.99 ea.
Cabinet Hardware – Contempo Living ( on line ) $103.60
Stainless Sink – Contempo Living ( on line ) $130
(18 guage brushed finish, thick undercoated and rubber pad added for noise control)
Faucet – Overstock.com $89.99
Garbage Disposer – PlumberSurplus.com $159.99
(We decided to upgrade the tiny builder one to a Waste King 8000 1 horsepower)
Total $573.56 (Replacing the garbage disposal wasn’t necessary, so we could have acturally done this whole thing for a little over $400)
Since the granite was a gift, this was a really inexpensive remodel, Fabulous gift.
There are all kinds of granite yards that have remnant pieces at really reduced prices, so just doing an island can make such a huge difference and not break the bank. Plus if you shop online you can find some really great prices for sinks and faucets. We did this reno 5 yrs. ago and everything still looks brand new and I am so pleased with it all.